Getting started with Kamaru: your complete guide
Learn how to set up Kamaru and start managing your properties in less than 5 minutes.
Managing rental properties doesn’t have to be complicated. Kamaru is designed to make property management simple, efficient, and stress-free. Whether you’re managing a single apartment or dozens of properties, this guide will help you get started.
What is Kamaru?
Kamaru is a free property management app that helps landlords and property managers organize their properties, track tenants, and manage leases—all from their mobile device. With AI-powered features like ID scanning and cloud backup so you can access your data from any device, Kamaru saves you time and reduces manual data entry.
Setting up your account
Getting started with Kamaru takes just a few seconds:
- Download the app from Google Play or App Store
- Tap “Login dengan Google” to sign in with your Google account
- Review the Terms of Service and Privacy Policy (linked at the bottom of the login screen)
- You’re in! The app opens to your Property List, ready for you to add your first property
Note: You can sign in with Google or Apple Sign-In.
Adding your first property
Creating a property is a two-step process:
Step 1: Basic information
- Tap the ”+” button on the Property List screen
- Enter a Property Name (required, max 40 characters, must be unique)
- Select a Property Type from the dropdown:
- Apartemen (Apartment)
- Guesthouse
- Hotel
- Rumah (House)
- Penginapan (Inn)
- Boarding House
- Kontrakan (Rented House)
- Ruko (Shop House)
- Villa
- Tap “Lanjutkan” (Continue) to proceed
Step 2: Address & rental details
-
Choose your rental type (this cannot be changed later):
- Sewa seluruh properti — Rent the whole property to one tenant
- Sewa per kamar — Rent individual rooms to multiple tenants
- Check “Hunian tidak disewakan untuk sekarang” if not renting yet
-
Enter the address:
- Select your Country (Indonesia or 25+ international countries supported)
- For Indonesia: Select Province → City → District from searchable dropdowns
- For international: Select State → City
- Enter Street Address (required)
- Add Postal Code (optional)
-
Tap “Simpan” (Save) to create your property
Tip: If the location API isn’t working, tap “Isi Manual” (Enter Manually) to type the address directly.
Adding rooms (for per-room rentals)
If you selected “Sewa per kamar” (rent per room), you can add individual rooms:
- Open your property from the Property List
- Tap “Tambah Kamar” (Add Room)
- Enter Room Number (required, max 4 characters, must be unique)
- Optionally add a Room Name (max 20 characters)
- Check “Kamar tidak disewakan untuk sekarang” if the room isn’t available yet
- Tap “Simpan” (Save)
Repeat for each room in your property. Each room can have its own price and tenant.
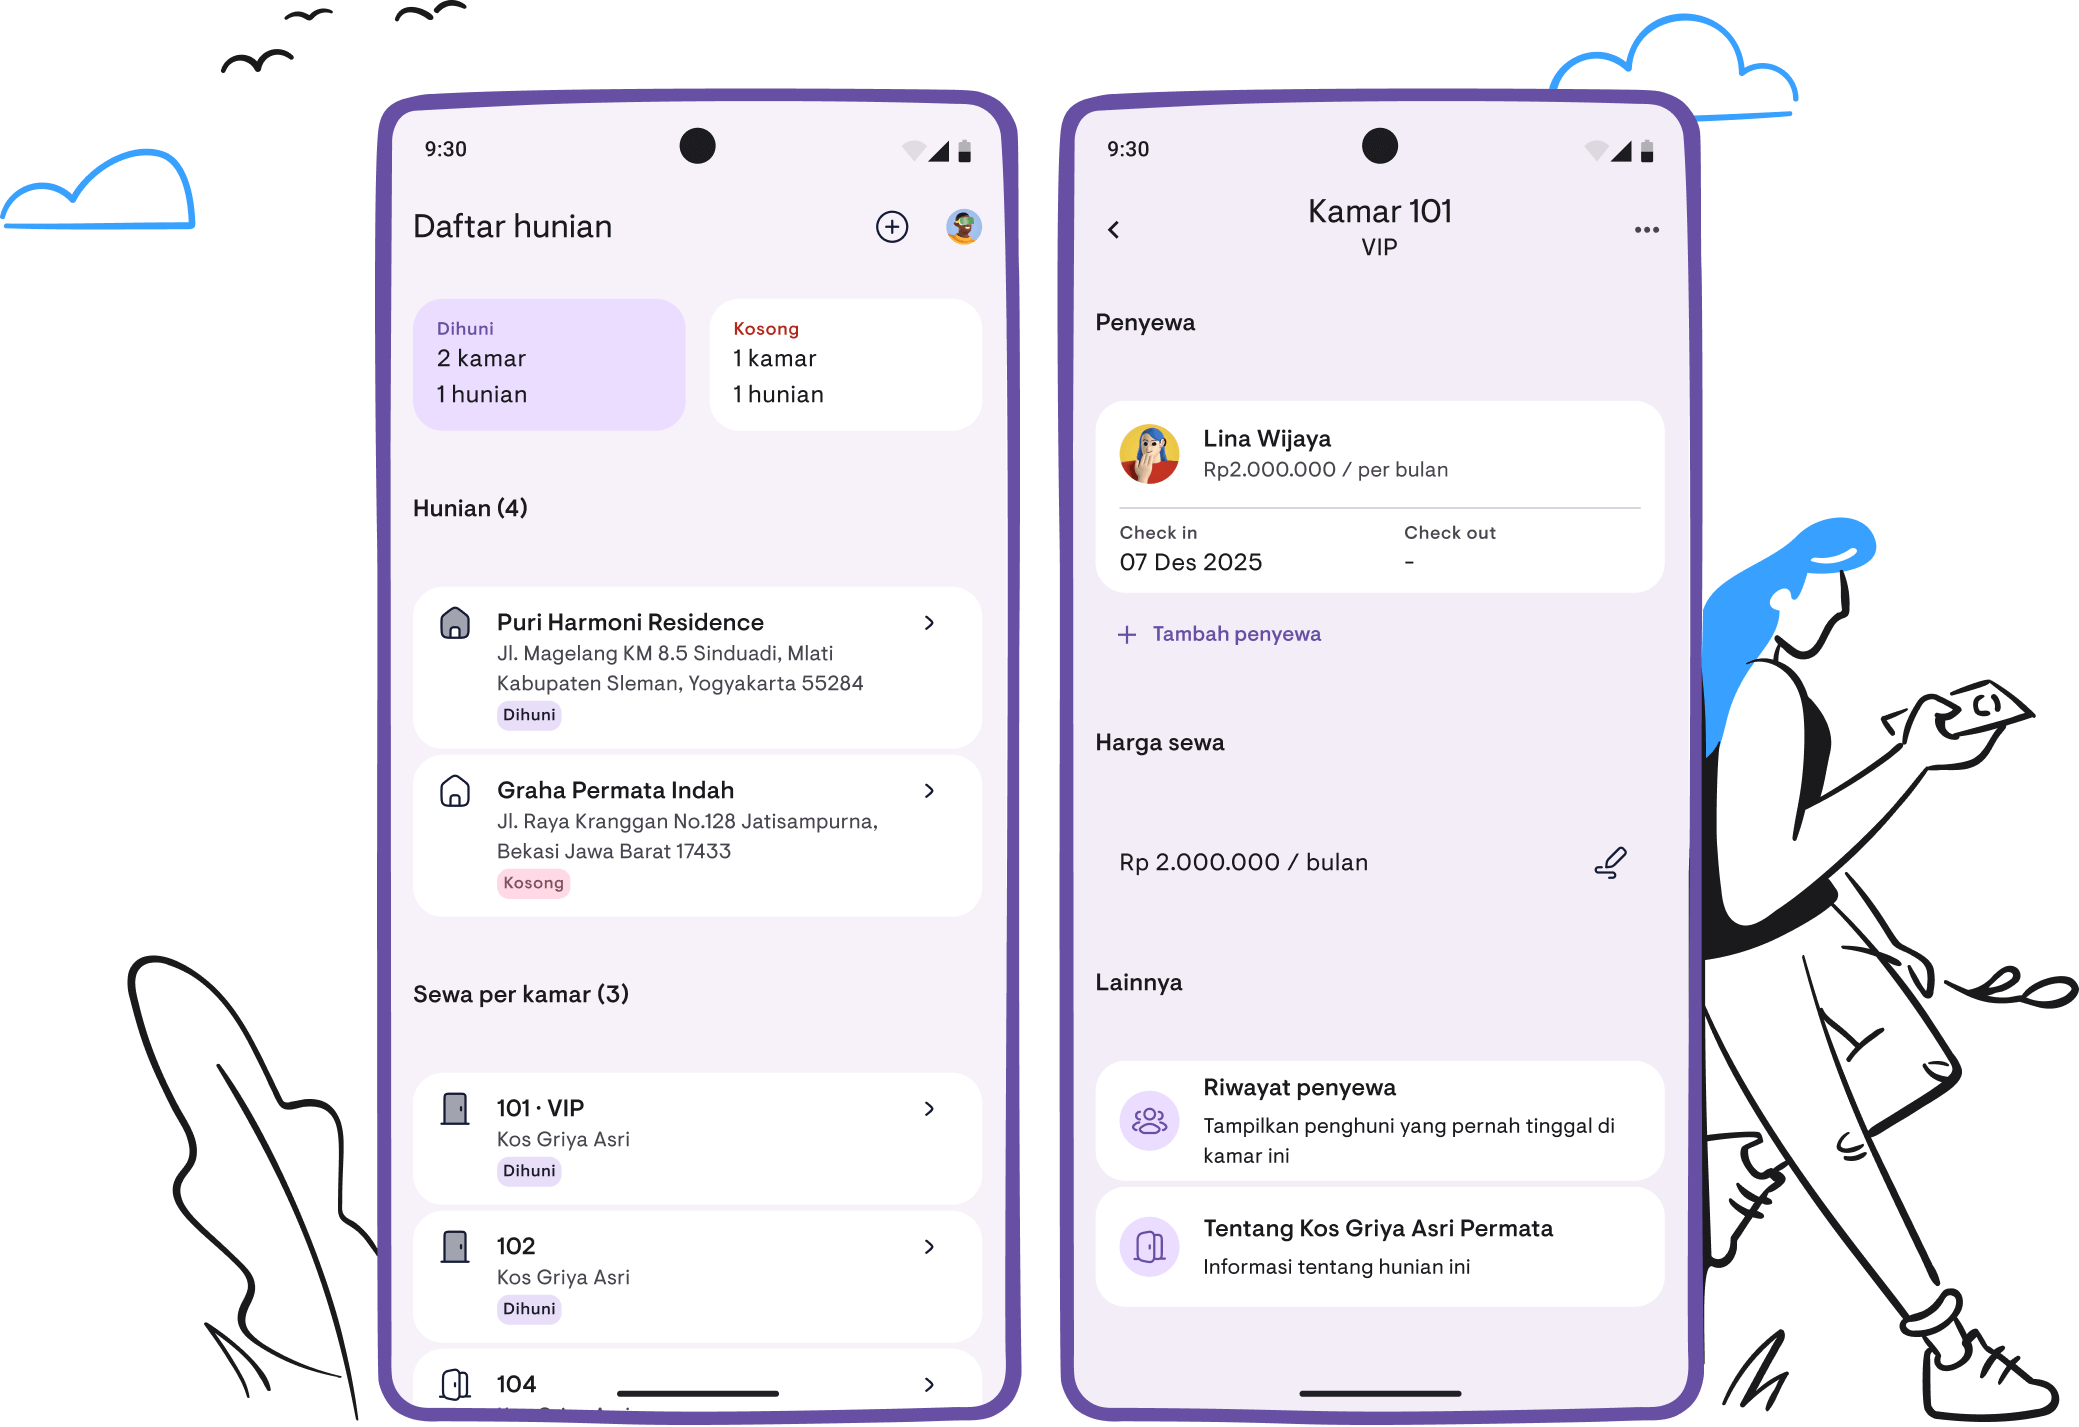
Adding tenants with AI-powered ID scanning
This is where Kamaru really shines. Instead of typing everything manually, let AI extract tenant information from their ID card.
Option A: Scan their ID (recommended)
-
Open a property or room, then tap “Tambah Penyewa” (Add Tenant)
-
Set the lease details first:
- Check-in Date — When the tenant moves in (defaults to today)
- Rental Price — Pre-filled from property/room price, adjust if needed
- Payment Period — Per hari (daily), Per minggu (weekly), Per bulan (monthly), or Per tahun (yearly)
-
Capture photos:
- Tap “Tambah Foto Wajah” to take a face photo (optional)
- Tap “Scan ID” to photograph their ID card
- The AI extracts: Name, ID Number, Gender, Date of Birth, Address, and more
- A banner shows “Informasi ID berhasil diekstrak” with the extracted data
-
Review and save:
- Check the extracted information
- Tap “Simpan” (Save) to create the tenant and lease
Supported ID types: National ID Card, Driver’s License, and Passport.
Option B: Enter details manually
-
Tap “Isi Form Manual” (Fill Form Manually)
-
Fill in the tenant information:
- Full Name (required)
- Phone Number (with country code, default +62)
- Email (optional)
- Gender — Laki-laki (Male), Perempuan (Female), or Other
- Nationality (searchable dropdown)
- ID Type — National ID, Driver’s License, or Passport
- ID Number
- Address
-
Expand “Informasi Detail” for additional fields:
- Place of Birth, Date of Birth, Blood Type, Occupation, Religion, Marital Status
-
Tap “Simpan” (Save)
Option C: Select an existing tenant
If you’ve added a person before (perhaps they’re renting another property):
- Tap the “Penyewa Terdaftar” tab
- Search or select from your existing tenants
- Set the lease details for this property/room
- Tap “Simpan” (Save)
Managing leases
Once a tenant is added, you can manage their lease from the Tenant Details screen:
Edit lease period
- Open the tenant from your property
- Tap the lease dates section
- Adjust Check-in Date or Check-out Date
- Tap “Simpan” (Save)
Edit rental price
- Open the tenant details
- Tap the price section
- Update the Rental Price and Payment Period
- Tap “Simpan” (Save)
End a lease
- Open the tenant details
- Tap the ⋮ (more) menu
- Select “Hapus Kontrak Sewa” (Delete Lease)
- Confirm the deletion
Tips for success
- Use ID scanning — It’s faster and more accurate than manual entry
- Set accurate prices — Property/room prices auto-fill when adding tenants
- Choose the right rental type — This cannot be changed after creation, so choose carefully
- Add photos — Face photos help you remember tenants; ID photos serve as records
- Keep data current — Update check-out dates when tenants leave
Property and room statuses
Understanding what the status labels mean:
| Status | Meaning |
|---|---|
| Tersedia (Vacant) | Ready for a new tenant |
| Terisi (Occupied) | Currently has an active tenant |
| Tidak Disewakan (Not Rented) | Not available for rental |
What’s coming next?
We’re constantly improving Kamaru based on user feedback. Here’s what we’ve shipped and what’s next:
Payment tracking— See the user guideFinancial reports— See the user guideCalendar view for bookings— See the user guideApple Sign-In— Now available- Payment reminders — Coming soon
- Auto-reminders for tenants — Coming soon
Need help?
Ready to simplify your property management? Download Kamaru today and start managing your properties the easy way.
For more advice on being a successful landlord, read our 5 essential tips for first-time landlords.
Have questions or feedback? We'd love to hear from you. Email us.

Start managing for free today
Join other landlords who are already using Kamaru to manage their properties.

